Purpose #
This document demonstrates how to use the 3CX webclient
Process #
Managing Extension Status and Queue Status #
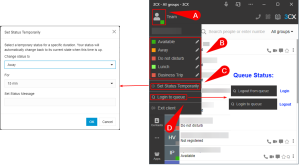
On the 3cx Web client window, click your Profile picture A to reveal the drop-down menu. From here you can change your extension status and queue status.
EXTENSION STATUS #
To set your extension status, click one of the status types B on the list
▪ Available – ready to receive calls
▪ Away – temporarily unavailable, divert to voicemail
▪ Do Not Disturb – Divert to voicemail
▪ Lunch – set a custom status
▪ Business trip – set a second custom status
You can also set a Temporary Status C for a specific duration, the status will automatically change back to its previous state when this time is up.
QUEUE STATUS #
If your extension is part of a call queue, your queue status must always be set to Login, or otherwise, you will not receive an incoming call.
To toggle between the Login/out, click the Login/out optionD . See the below image to identify your queue status.
REMEMBER
If your extension is part of a Call Queue, in order to receive an incoming call from a Call Queue (external call), your extension status must always be set to Available and queue status set to Login.
▪ Available & Login = receive both internal and call queue calls
▪ Available & Logout = receive ONLY internal calls
▪ DND & Login = NO call
▪ DND & Logout = NO call
Set Default Phone #
The 3CX Web client can be used on its own or as a management interface for another phone device (e.g. desk phone, 3CX Mobile App, etc).
When the Web client uses on its own, the default phone must be set to 3CX Web client.
If you don’t see the Dialer window open, click the Dialer icon A. On the Dialer window, see the Call Using. If not set to Browser, click the Down Arrow icon B and select Browser C
When the Webclient is being used as a managing interface for another phone, the default phone must be set to the correct phone type.
Check the Dialer window’s current Call Using status, it must be set to the type of phone you’re using. For example,
▪ if using 3CX Mobile App (Android / iOS), set to Smartphone
▪ if using a Yealink desk phone, set it to Yealink
Extension Provision on Multiple Devices:
If your extension is set up on multiple phones, you will see multiple phones on the list. In this case, you must select the phone you want the Webclient to link to. Selecting the correct phone is important because the Webclient acts as an interface for the default phone. For example, when you dial a number on Webclient, the call is forwarded to its default phone. So the one that makes the call is its default phone, not the Webclient.
To identify which is the correct phone on the list, get the phone’s MAC address. On most Yealink desk phones, to see its MAC address click the OK button.
How to make a call #
Click the Dialer icon A
Dial the number B you want to call.
Click the Green Call C button
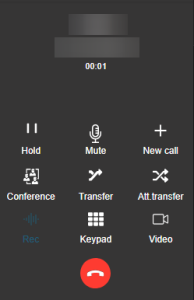
During a phone call options #
During a phone call, you have the following options:
▪ Hold
▪ Mute
▪ New Call
▪ Conference
▪ Transfer (blind / attended)
▪ Rec -Record the phone call. Sometimes this feature is automatically enabled, you can choose not to record the call by clicking the Rec icon (Blue Rec = Recording)
▪ Keypad – show Keypad
▪ Video
▪ End call
A blue coloured icon means the function is active. For example, the below picture shows a blue Rec icon = phone call is recorded
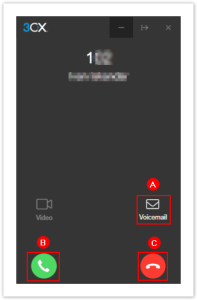
Receiving a Call #
When you’re receiving an incoming call, you have 3 options: PickupB, Decline C, or send to Voicemail A
If your extension doesn’t have a voicemail feature enabled, when you select to send to voicemail A, the call is lost.
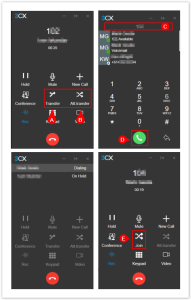
Call Transfer #
During a phone call, the call can be transferred “blind” A, without informing the person receiving the call, or “attended” B, in which the call stays on hold while a transfer is requested.
▪ Transfer A
▪ Att. Transfer B
Dial C the phone/extension number you want to transfer the call to, then press the Call D button
In the first step, if you select the Transfer A option, the call will get transferred immediately once you press the Call D button. If the transferring party is not available, the call is lost. If you select Att. Transfer B, you can talk to the transferring party first, and you must click the Join E button to complete the transfer.
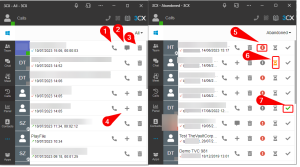
Managing Call history and Abandoned Calls #
On the 3CX Webclient window, click the Calls A icon, click the down arrow B icon to filter the call log for Incoming, Outgoing, Missed, and Abandoned calls
When you place the mouse cursor over a call log, you will see the following options:
▪ Call 1
▪ Chat 2
▪ Delete 3
▪ Add Contact 4
ABANDONED CALLS #
On Abandoned Call, use the icon to communicate with your team:
When you see the Red Exclamation 5 icon, this indicates the call is abandoned, waiting for someone to call them back. When you’re calling them back, click the Gray Hour Glass icon, it will turn Yellow 6 so your team knows someone is currently looking into it. When you’re done with it, click the Gray Tick icon, to turn it to Green 7.
▪ Red Exclamation 5 – not dealt
▪ Yellow Hour Glass 6 – dealing
▪ Green Tick 7 – dealt
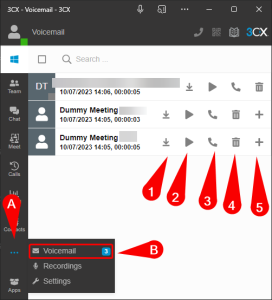
Managing Voicemail #
On the 3CX Webclient window, click the three dots A icon, then select the Voicemail B option
When you place the mouse cursor over a voicemail, you will see the following options:
▪ Download 1
▪ Play on Phone 2 – this will call your default phone
▪ Call 3
▪ Delete 4
▪ Add Contact 5
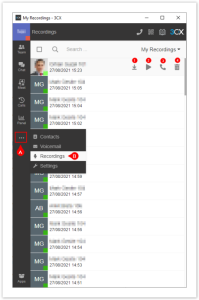
Managing Call Recording #
On the 3CX Webclient window, click the More Options A icon, then select the RecordingsB options
When you place the mouse cursor over a recording, you will see the following options:
▪ Download 1
▪ Play on Phone 2 – this will call your default phone
▪ Call 3
▪ Delete 4
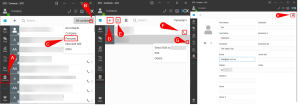
Managing Contacts #
On the 3CX web client, click Contacts A
Click the down arrow B icon to filter the contacts for Personal C
On the contact list page, you have the option to Call F, or click the More Options G icon to see these options: Send SMS , Edit and Delete
To add a new contact
▪ Upload a CSV file E
▪ Add a contact D – fill in the contact details, and click the Save H icon
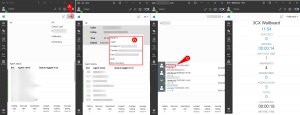
Panel #
3CX Panel allows users to easily manage call traffic, by monitoring the ongoing calls, and answering or transferring calls.
To change the Panel view mode, click the down-arrow icon A you can select: All, Queue Calls, call queue(s), Wallboard
Depending on your extension rights you may be able to do the following B:
▪ pick up a call
▪ drop call in progress
▪ divert a call
▪ transfer call
▪ parked a call
▪ intervene on calls
▪ communicating with a worker using the whisper function
▪ barge into the call and talk right to the caller
▪ stop a recording of a phone call
QUEUE – VIEW ALL QUEUE ACTIVITY ON A SINGLE SCREEN #
The Queue Manager allows users to view calling activity on specific queues. They can pick up, divert or drop a call with a few clicks. They can also drag and drop a call on a specific extension.
The queue agents (extension) in the Panel Queue page are listed in extension number order, not in the agent position order. If you need to rearrange or remove the queue agent list. Send a ticket to
Queue Manager can Logout agents by clicking on their queue status C
When you Logout a queue agent from the Panel, you MUST Login the agent back from the Panel.
REMEMBER
Queue agent status must always be set to Available and queue status set to Login in order to receive calls from a call queue.
-Available & Login = receive both internal and call queue calls
-Available & Logout = receive ONLY internal calls
-DND & Login = NO call
-DND & Logout = NO call
Wallboard – view real-time queue statistics to evaluate:
Users can also keep in close touch with employee performance with the 3CX Wallboard, which tracks all calls, answered, ongoing, or abandoned.
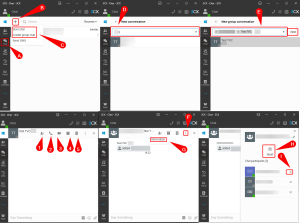
Chat #
The 3CX Chat feature allows your team to chat and share files with each other.
On the 3CX Webclient window click the Chat A icon
Click the Add (+) B icon select Start Chat (one-on-one) or a Group Chat C
Select the chat participant(s) D or E
On the chat conversation window, you have the following options:
▪ Add Participant(s) 1
▪ Call 2 – not available in Group chat
▪ Video 3 – not available in Group chat
▪ Archive 4
▪ Delete 5
▪ More Option F icon >> Information G
On the information page, you can rename the conversation name, make a call (Single Chat) or meeting H (Group Chat), and remove participant I